Miami Bitcoin Nerd Miner.925 Lab
THE WYNWOOD SERIES — “The Ticket” | CYD ESP32 Bitcoin Lottery Miner
THE WYNWOOD SERIES — “The Ticket” | CYD ESP32 Bitcoin Lottery Miner
Couldn't load pickup availability
Every block found on the Bitcoin network starts with a single hash. The Ticket is your hash — submitted every second, around the clock, for less than the cost of a cup of coffee per month.
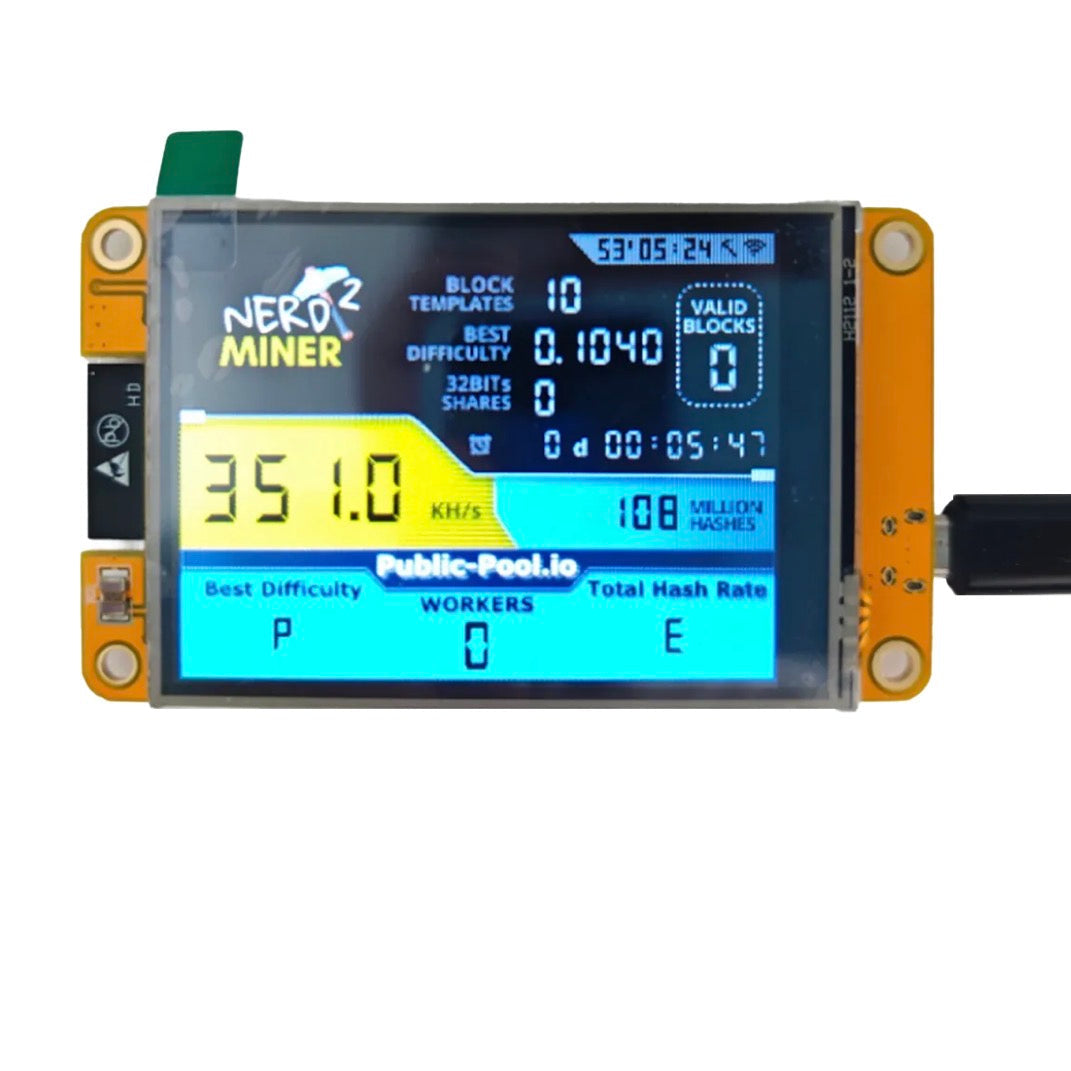
The Ticket is built on the ESP32 CYD (ESP32-2432S028) — a dual-core microcontroller with a built-in 2.8” color touchscreen display. It runs NerdMiner firmware, connecting directly to the Bitcoin network via your home Wi-Fi and submitting SHA-256 hashes to a solo mining pool 24/7. No fans. No noise. No complex setup.
Is it likely to find a block? No. Is it possible? Yes. On March 10, 2025, a device running just 480 GH/s — far less powerful than even a Bitaxe — found a full Bitcoin block worth over $258,000. Every hash counts. Every ticket is real.
The Ticket is also the perfect introduction to Bitcoin mining for anyone curious about how the network actually works. Watch your hashrate live on the built-in display. See your best difficulty. Understand what mining is — not as an abstract concept, but as something happening on your desk right now.
We named it The Ticket because that’s exactly what it is — honest about the odds, honest about the dream.
Specs:
Processor: ESP32-D0WDQ6 Dual-Core (240 MHz)
Firmware: NerdMiner v2
Hashrate: ~350–377 KH/s (optimized firmware)
Power Consumption: ~0.5W (USB-C powered)
Display: 2.8” built-in color TFT touchscreen
Connectivity: 2.4 GHz Wi-Fi + Bluetooth
Power Input: USB-C (any USB power brick or wall adapter)
Operating Cost: ~$0.01/month in electricity
What’s in the Box:
CYD ESP32 NerdMiner unit (pre-flashed)
USB-C cable
Quick start card
SETUP GUIDE — The Ticket (CYD ESP32 NerdMiner)
What You Need:
USB power brick or wall adapter (any phone charger works)
USB-C cable (included)
2.4 GHz Wi-Fi network
Bitcoin on-chain wallet address
Step 1 — Power On
Plug The Ticket into any USB power source using the included USB-C cable. The color display will light up and show a QR code or network prompt within a few seconds.
Step 2 — Connect to the NerdMiner Hotspot
On your phone or computer, go to Wi-Fi settings. Connect to the network named “NerdMinerAP”. If prompted for a password, enter: MineYourCoins
Step 3 — Configure Wi-Fi
Your browser will open automatically to a setup page. Select “Configure Wi-Fi”, choose your home network, and enter your Wi-Fi password.
Step 4 — Enter Your Bitcoin Wallet Address
In the “Your BTC Address” field, enter your Bitcoin on-chain wallet address. This is where your block reward goes if you win. Do not use an exchange address.
Step 5 — Save and Start Mining
Click Save. The device will reboot and connect to your home Wi-Fi. The display will show your live hashrate, best difficulty found, and network stats.
Step 6 — Monitor Your Ticket
The built-in display shows:
Live hashrate (KH/s)
Best difficulty found (your closest call)
Network difficulty
BTC price
Wi-Fi signal strength
Days, hours, minutes of uptime
Double-tap the display to switch to desktop clock mode — Bitcoin lottery runs silently in the background.
Tips:
Keep plugged in 24/7 for best results
Use a 2.4 GHz network only (5 GHz not supported)
Pairs great with a Bitaxe or NerdQaxe++ for a full lottery stack